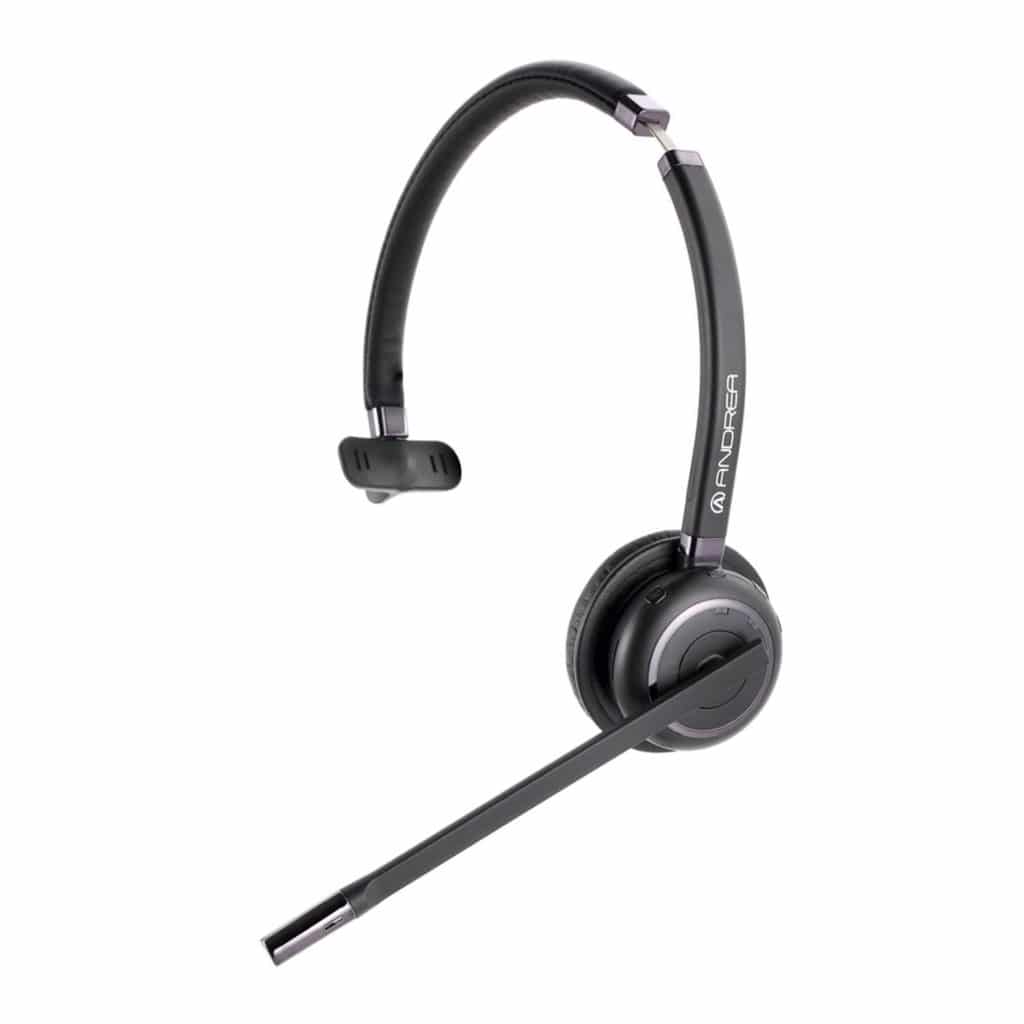
Wireless Noise-Canceling Bluetooth® Mono Headset
(C1-1030600-1)
Installation
To topA Answer/End; Pairing/Reconnect; Redial Last Number
B Volume Up
C Volume Down
D Power On/Off
E Charging Port
F Battery Charging Indicator LED
G Bluetooth Connection LED
H Mic Mute (mobile phone use only); Pause (playing music on WNC-2500 only)
GETTING STARTED WITH PHONE OR TABLET:
- Make sure your headset is fully charged prior to its first use. Plug it into the USB port on your computer with the supplied USB charging cable (the computer must be powered on) The indicator light will turn red indicating the unit is charging. When the headset is fully charged, the indicator light will turn green for five minutes and then shut off.
NOTE: The lifetime of the battery will be significantly reduced if your device is left uncharged for long periods of time. We therefore recommend that you recharge your device at least once a month. - Activate Bluetooth on your mobile phone or tablet.
- Pair your headset to your mobile phone or tablet. The headset will go into pairing mode automatically when it is turned on.
Your WNC headset is easy to operate. The answer/end button performs different functions depending on how long you press it.
| Instructions | Duration | |
| Tap | Tap briefly | |
| Double Tap | 2 quickly repeated taps | |
| Press | Press and hold for 1 second | |
| Press and Hold | Press and hold for 5 seconds |
TURNING YOUR HEADSET ON AND OFF
- Slide the On/Off button (D) towards the symbol “1” to turn the headset On. When you do, the right hand LED indicator will flash on both the WNC-2100 and WNC-2500.
- Slide the On/Off button (D) towards the symbol “O” to turn the headset OFF.
PAIRING WITH YOUR PHONE OR TABLET
- Put the headset in pairing mode:
When you turn on your Andrea Communications WNC Headset for the first time, the headset will automatically go into pairing mode, so that your device can “Discover” it. When the headset is in pairing mode, the Bluetooth status indicator LED on the left hand side is flashing. - Set your Bluetooth capable phone or tablet to “Discover” mode:
First, make sure that Bluetooth is activated on your phone or tablet. Then set your phone or tablet to discover new devices. This usually involves going to a “Set-Up”, “Connect”, or “Bluetooth” menu on your phone or tablet and selecting the option to “Discover” or “Add” a Bluetooth device. (Refer to your phone or tablets instruction manual) - Your phone or tablet will find the Andrea WNC Series:
Your phone or tablet will find he headset under the name “Andrea WNC Series”. Follow the instructions provided by your phone of tablet manufacturer for pairing and connecting the WNC. You may be asked to confirm the WNC device with a a passkey or PIN. Use 0000 (four zeros). Your phone or tablet will confirm when pairing is complete and the Bluetooth status LED indicator will shift from a flashing light to a steady light, and the headset voice guidance will say “Connected”. - Manual pairing mode:
If the pairing process was interrupted, you can manually set the headset to pairing mode. Make sure the headset is on. Press and hold the the Answer/End button (A) for approximately 5 seconds until the Bluetooth Connection LED (G) turns from a steady light to a flashing light. Then, repeat steps 2 and 3 in the pairing guide above. - Connecting with your phone or tablet:
Pairing is only needed the first time a headset and phone or tablet are used together. When the headset and phone or tablet have been paired once, they will automatically connect when the headset is on and Bluetooth is activated on your phone or tablet. The headset must be “Connected” to the phone or tablet to operate. If the devices are paired but do not immediately connect, tap the Answer/End button (A). When the headset is connected, the Bluetooth connection LED (G) will be on for 3 seconds and the headset voice guidance will say “Connected”.
THE WNC-2100 / WNC-2500 IS READY FOR USE.
PAIRING WITH YOUR COMPUTER
Windows Vista and Windows 7
- Plug the supplied Bluetooth dongle into any *direct USB port on your computer. Allow the Windows supplied drivers to install.
*All notebook computer USB ports are direct, but only rear desktop computer USB ports are direct. Avoid USB splitters if possible. - Turn on your fully charged WNC headset.
- Click the Windows Start button and select “Devices and Printers”
- Click “Add a device”
- Select the Andrea WNC Series then click Next.
- Once the Windows supplied drivers have installed and the device has been successfully added to your computer, you can click Close.
- Your WNC headset is now ready to use.
Windows 8 and Windows 10
- Plug the supplied Bluetooth dongle into any *direct USB port on your computer. Allow the Windows supplied drivers to install.
*All notebook computer USB ports are direct, but only rear desktop computer USB ports are direct. Avoid USB splitters if possible. - Turn on your fully charged WNC headset.
- In the Windows Start screen search box type “control”, then select Control Panel.
- Be sure “View by” is set to Large icons. Select Bluetooth Devices.
- Click on Add Device and select Audio/Video Device.
- Select the Andrea WNC Series, then click Next.
- Windows will install the device, and once the “Bluetooth device connection successful” message appears click Finish.
- Your WNC headset is ready to use.
MAC Computers
- The supplied dongle is NOT required for set up.
- Go to System Preferences, then click Bluetooth.
- Turn on your fully charged WNC headset. It will automatically go into pairing mode.
- Select the Andrea WNC Series and click Pair.
- Return to System Preferences, then click Sound.
- Be sure the WNC is highlighted for use in both the ‘Output’ and ‘Input’ tabs.
- Your WNC headset is now ready to use.
HOW TO:
- Answer a call
Tap the Answer/End Button (A) to answer a call. - End a call
Tap the Answer/End Button (A) to end an active call. - *Reject a call
Press the Answer/End Button (A) when the phone rings to reject an incoming call. Depending on your phone settings, the caller will either be forwarded to your voice mail or will hear a busy signal. - Make a call
When you make a call from your mobile phone, the call will (subject to phone settings) automatically transfer to your headset. If your phone does not not allow this feature, tap the Answer/End Button (A) to transfer the call to the headset. - *Activate voice dialing
Press the Answer/End Button (A). For best results, record the voice dialing tag through the your headset. Please consult the user manual for your mobile phone for more information about using this feature. - *Redial last number
Double tap the Answer/End Button (A) when the headset is on and not connected to a call. - *Adjust sound and volume
Tap the Volume UP (B) or Volume Down (C) to adjust the volume. - *Mute/Un-Mute (mobile phones only)
To mute your voice, tap the Mic Mute Button (H).
To un-mute your voice, tap the Mic Mute Button (H) once again. - *Call waiting and placing a call on hold
To put a call on hold during a conversation and answer a waiting call, Press the Answer/End Button (A) once, then answer the waiting call.
Press the Answer/End Button (A) to switch between the two calls.
Tap the Answer/End Button (A) to end the active conversation.*Some headset functions may not be supported by all mobile phones, tablets, computers and or applications.
Product Manual
To topFAQ
To topFrequently Asked Questions
-
Can I use the WNC-2100 with my Windows 10 computer?
Yes, however typical phone features such as the mute, and call buttons will not function.
-
The CSR Bluetooth dongle supplied with my WNC headset will not work on my Windows 10 computer.
Please try the following:
In the search box type” Device manager” and open it.
Click on the small arrow next to either “Bluetooth” or “Universal Serial Bus controllers”
Right click on “CSR” and select Update Driver
Select ”Browse my computer for driver update”
Select on bottom “Let me pick from a list of available drivers on my Computer”
Select “Generic Bluetooth Driver”
This should fix your driver issue and enable your CSR Bluetooth dongle.
-
My device is paired but how do I connect it to my Windows computer?
Go to Windows sound settings and Right click on the WNC device and select Connect.
-
My WNC headset is grayed out in my Windows sound settings.
Simply Right click on the grayed-out device and select Connect.
-
My headset is not responding on my Windows computer.
Go to your Windows sound settings and confirm the WNC headset is Connected and set as your default Playback and Recording device.
-
Can I use the WNC-2100 with my X-Box or PlayStation game console?
No. While the WNC-2100 will work brilliantly for on-line gaming it will not work with proprietary game systems such as X-Box, Wi, or PlayStation.
-
My new laptop / notebook / tablet / computer does not have a USB port and has only one audio port. Will my the WNC-2100 work?
If the computer has reliable built in Bluetooth capabilities, the WNC-2100 should work without the dongle. However, you may need a power adapter. Andrea model wall charger C1-1031400-1
-
What is the range of my WNC-2100?
The WNC-2100 has a range of up to 30 feet. Keep in mind that other factors may reduce this distance, such as electronic noise from other equipment and certain types of steel building construction, etc.
-
Can I use my WNC-2100 while it is charging?
The WNC-2100 must be fully charged prior to its first use, after which it can be charged while in use.
-
Can the battery in my WNC-2100 be replaced?
No, the Lithium-Ion battery is a non-serviceable part.
-
How do I request warranty service?
If your device is still not functioning after contacting the Andrea Support Team, you will be asked to submit your proof of purchase via email or fax, verifying that the product was purchased within 1 year. You will then be issued a return material authorization (RMA) number, with complete shipping instructions to return the device to our facility for evaluation. The customer is responsible for the return shipping. A traceable method such as UPS or Fed-X ground is recommended. If the device is found to be defective after evaluation at our facility, a new device will be shipped to you free of charge.
System Requirements
To topCompatible with:
Apple Macintosh OS X 10.5 and up
Google Chrome
Windows 8
Windows 8.1
Windows 10
Windows 11